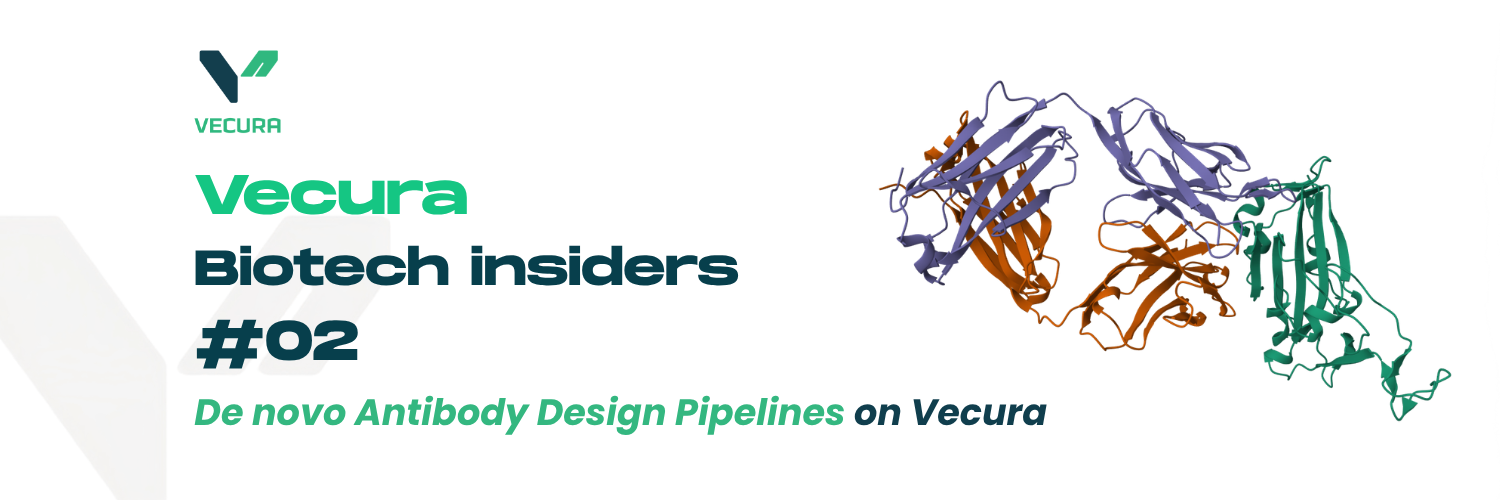
Vecura Biotech Insiders #02: De novo Antibody Design Pipelines on Vecura
In this second edition of Vecura Biotech Insiders, we highlight a workflow shared with the Vecura team by Tony 阮进成 during the support process.
A User-Shared Workflow from the Vecura Community
In antibody design, generating candidates is only the first step.
The harder question is what happens next: how should researchers compare outputs from different design pipelines, decide which predictions are worth advancing, and identify hidden structural liabilities before moving toward wet-lab validation?
In this second edition of Vecura Biotech Insiders, we highlight a workflow shared with the Vecura team by Tony 阮进成 during the support process.
This workflow employed two antibody design models from Vecura targeting the same antigen: BoltzGen and RFantibody. Both pipelines generated antibody designs, and both outputs were then reviewed through the same downstream lens: interface-level confidence metrics and sequence alignment against the parent structure.
Run Snapshot
| Metric | What This Workflow Included |
|---|---|
| 2 | SOTA pipelines, one platform |
| 20 | Full-IgG designs generated |
| 10/10 | BoltzGen designs lost the VL disulfide |
| 6.32 | Best interface PAE, observed in the RFantibody run |
The key lesson was not simply which design ranked first. The more important finding was that one pipeline produced a numerically promising output while also missing a conserved disulfide that would matter for developability and expression.
This is where workflow-level review becomes critical.
Research Context: Why One Score Is Not Enough
Generative antibody design workflows can produce candidates quickly, but raw outputs still need careful triage.
A model may return a candidate that looks promising based on one confidence score, but that does not automatically mean the design is ready to advance. For antibody workflows, researchers need to evaluate several layers at once:
| Review Layer | Why It Matters |
|---|---|
| Interface confidence | Helps estimate whether the antibody is predicted to engage the antigen |
| Interface geometry error | Helps assess whether the predicted antibody-antigen interface is reliable |
| Fold confidence | Helps evaluate whether the antibody structure itself is predicted to fold properly |
| Sequence alignment | Helps reveal whether important framework residues are preserved |
| Developability liabilities | Helps flag motifs or structural issues that may affect expression, stability, or downstream testing |
The workflow shared by Tony shows why these layers should not be read in isolation.
A design can look strong on an interface metric but still carry a structural issue. Another design can fold confidently but fail the interaction filter. In antibody design, ranking should be based on the metrics that answer the actual question, not only the most visible score.
Workflow Overview: Two Pipelines, One Target, One Review Lens
The objective was to design full IgG antibodies against the SARS-CoV-2 spike receptor-binding domain using the antibody-RBD complex in PDB 6W41 as the structural template.
This target was used as a benchmark epitope, not as a therapeutic development objective. It is a well-characterized system with a solved complex, making it useful for examining what generative pipelines produce and how the outputs should be interrogated.
The workflow followed four main stages:
| Step | Workflow Stage | Purpose |
|---|---|---|
| 1 | Select benchmark antigen-template complex | Use a known antibody-RBD complex as the design context |
| 2 | Run two antibody design pipelines | Generate candidates using BoltzGen and RFantibody |
| 3 | Rank outputs using interface-level metrics | Review predicted binder quality rather than relying on platform rank alone |
| 4 | Align sequences against the parent | Check whether framework anchors and conserved residues are preserved |
In total, the workflow generated 20 full-IgG designs: 10 from BoltzGen and 10 from RFantibody.
Tools Used on Vecura: BoltzGen and RFantibody
| Tool | Role in This Workflow |
|---|---|
| BoltzGen | Used as a de novo binder design pipeline to generate antibody designs against the template |
| RFantibody | Used as an antibody design pipeline combining RFdiffusion, ProteinMPNN, and RoseTTAFold2 filtering |
| MAFFT alignment | Used to compare generated sequences against the parent and inspect framework conservation |
| Vecura | Provided a unified environment to run, compare, and review outputs from multiple design methods |
In this workflow, the value came from running more than one method and reviewing the outputs with the same evaluation logic.
Rather than treating each model output as a final result, Vecura helped support a comparative workflow: generate, rank, align, inspect, and decide what is worth advancing.
What the BoltzGen Run Showed
BoltzGen generated 10 designs that passed its internal filters.
Table 1. BoltzGen designs ranked by interface quality.
| Design | iPTM | min PAE | pTM | RMSD | H-bonds | ΔSASA |
|---|---|---|---|---|---|---|
| design_spec_22 | 0.79 | 2.69 | 0.82 | 1.53 | 6 | 836 |
| design_spec_08 | 0.72 | 3.71 | 0.81 | 1.79 | 7 | 890 |
| design_spec_00 | 0.67 | 4.66 | 0.80 | 1.52 | 5 | 915 |
| design_spec_23 | 0.62 | 5.23 | 0.79 | 1.75 | 7 | 915 |
| design_spec_25 | 0.57 | 5.85 | 0.78 | 1.57 | 7 | 915 |
| design_spec_04 | 0.53 | 5.73 | 0.78 | 1.57 | 4 | 898 |
| design_spec_09 | 0.51 | 6.12 | 0.78 | 1.67 | 5 | 923 |
| design_spec_06 | 0.50 | 7.41 | 0.76 | 1.96 | 4 | 866 |
| design_spec_21 | 0.48 | 7.33 | 0.76 | 1.47 | 4 | 936 |
| design_spec_11 | 0.31 | 14.25 | 0.75 | 1.77 | 3 | 923 |
iPTM is interface confidence (above 0.7 good, above 0.8 strong); min PAE is interface geometry error in Å (below 5 good); RMSD is refold agreement with the designed backbone; ΔSASA is buried interface area in Ų. The lead is highlighted.
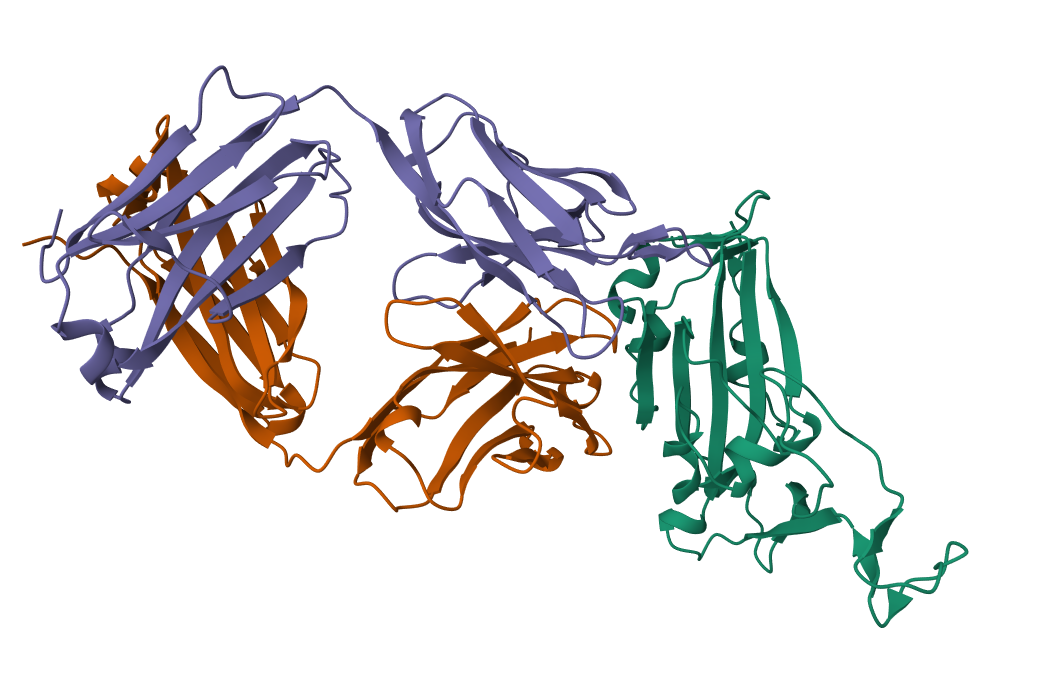
Figure 1. Predicted structure of the BoltzGen lead, design_spec_22.
When ranked by interface-related quality metrics, design_spec_22 stood out as the strongest BoltzGen candidate in this run. It showed the best interface iPTM, the lowest interface PAE, strong pTM, tight refold RMSD, and six interface hydrogen bonds.
| BoltzGen Lead | Key Predicted Metrics |
|---|---|
| design_spec_22 | iPTM 0.79, min PAE 2.69 Å, pTM 0.82, RMSD 1.53 Å, 6 H-bonds |
On interface confidence alone, this looked like a promising candidate.
However, the sequence alignment revealed a critical issue.
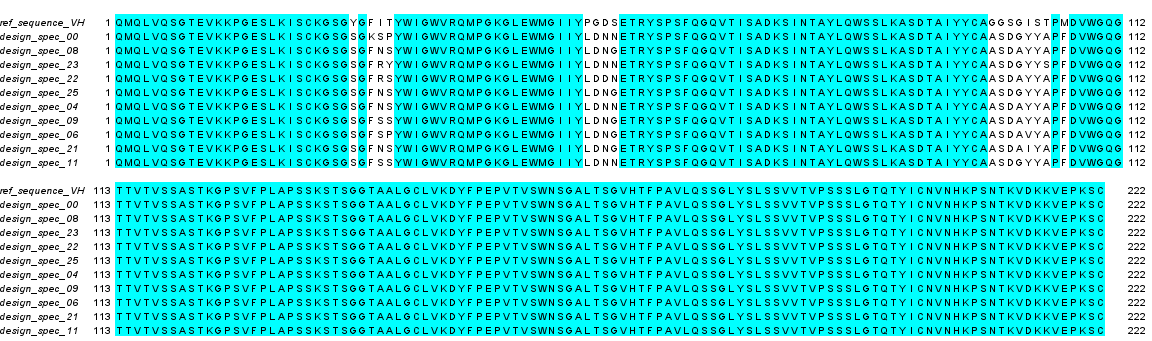
Figure 2. MAFFT alignment of the BoltzGen heavy-chain designs. All six CDRs are redesigned; frameworks are unchanged.
Across all 10 BoltzGen light-chain designs, the two conserved framework cysteines that form the VL intra-domain disulfide were mutated away. The parent structure preserved this pair, but every generated BoltzGen design lost it.
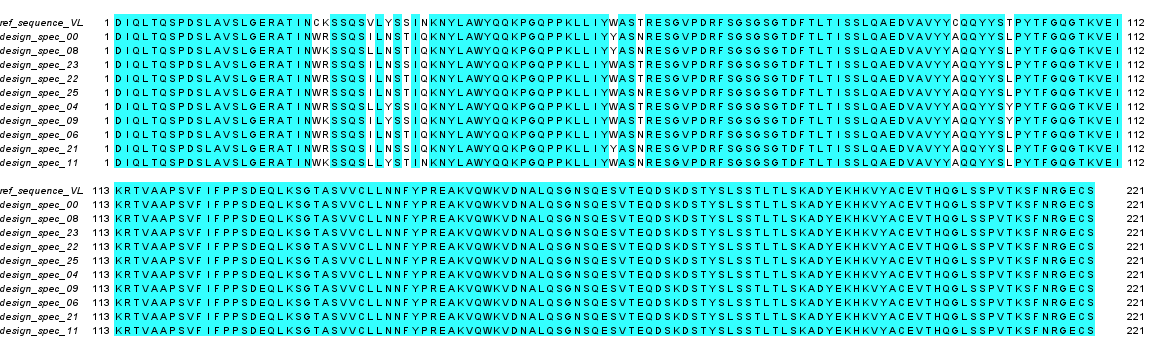
Figure 3. MAFFT alignment of the BoltzGen light-chain designs. The conserved Cys23 and Cys88, immediately flanking CDR-L1 and CDR-L3, are lost in all ten designs.
This matters because the conserved VL disulfide helps stabilize the light variable domain. Losing it can become a serious developability and expression liability.
The important point is that this issue was not visible from the ranking table alone. It emerged only after aligning the generated sequences against the parent and inspecting the framework anchors.
What the RFantibody Run Showed
RFantibody produced a different output profile.
Table 2. RFantibody designs ranked by interaction PAE.
| Design | interaction PAE | global PAE | pred_LDDT | CDR RMSD | H3 RMSD | Filter |
|---|---|---|---|---|---|---|
| Design_03 | 6.32 | 4.52 | 0.89 | 3.89 | 3.68 | pass |
| Design_04 | 8.51 | 5.76 | 0.87 | 4.01 | 6.80 | pass |
| Design_07 | 9.71 | 6.21 | 0.88 | 4.64 | 6.51 | borderline |
| Design_09 | 15.06 | 8.94 | 0.87 | 4.71 | 3.79 | fail |
| Design_10 | 15.56 | 9.38 | 0.86 | 4.47 | 6.56 | fail |
| Design_01 | 17.48 | 9.68 | 0.91 | 3.55 | 2.00 | fail |
| Design_06 | 17.52 | 10.01 | 0.88 | 4.92 | 6.34 | fail |
| Design_05 | 18.22 | 10.53 | 0.87 | 4.79 | 3.21 | fail |
| Design_02 | 19.53 | 11.20 | 0.87 | 3.14 | 4.76 | fail |
| Design_08 | 19.85 | 11.41 | 0.87 | 2.89 | 2.37 | fail |
The interface geometry error across the antibody-antigen interface and the single most predictive filter for these binders. The established success cutoff is below 10. Green passes, amber is borderline, red fails.
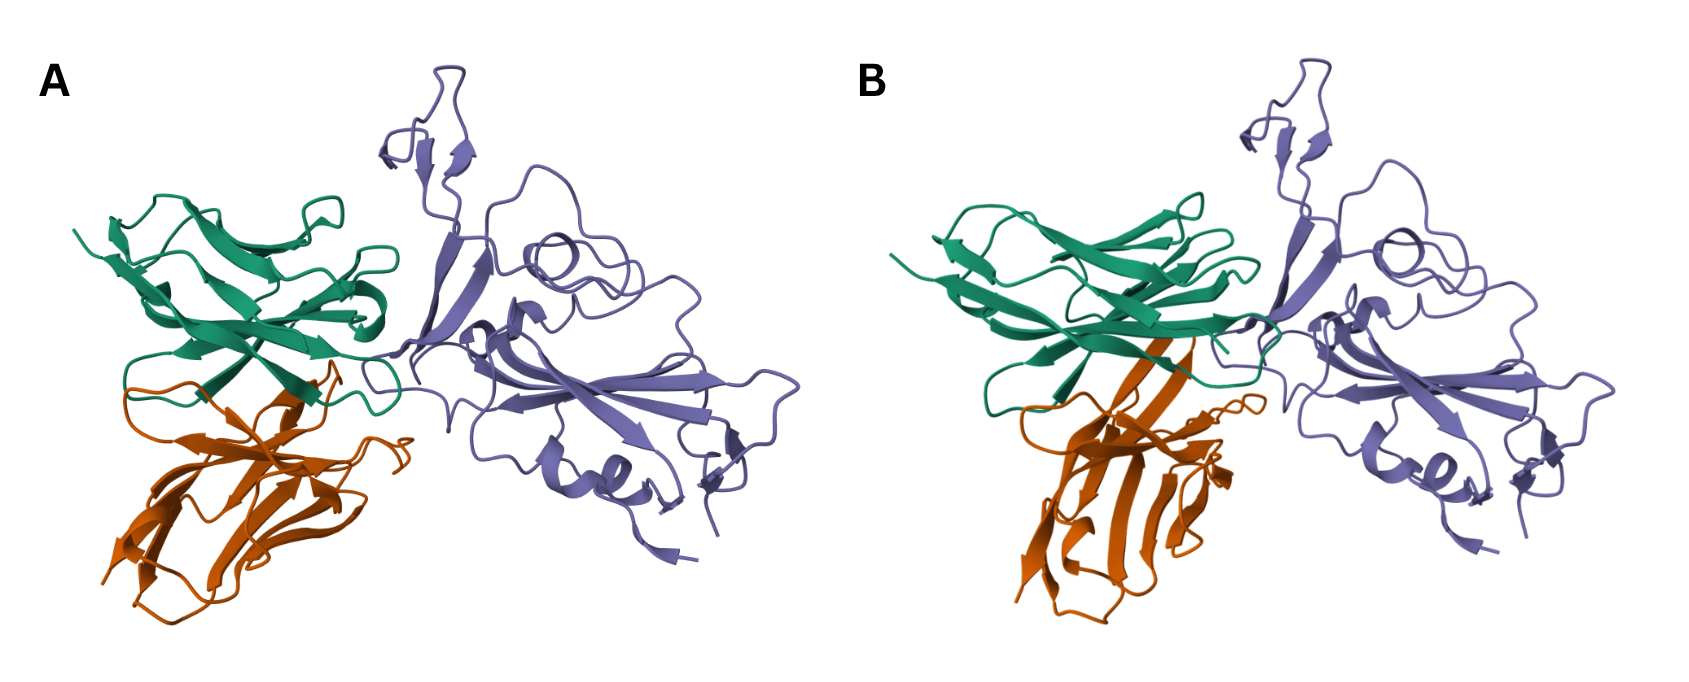
Figure 4. Predicted structures of the RFantibody lead design_03 (A) and runner-up design_04 (B).
Its workflow generated 10 independent designs and ranked them using RoseTTAFold2 filter metrics. In this run, interaction PAE was the key decision variable because it reflects the predicted alignment error across the antibody-antigen interface.

Figure 5. MAFFT alignment of the RFantibody heavy-chain (A) and light-chain (B) designs. Changes are CDR-only and diverge substantially between designs.
| RFantibody Candidate | Interpretation |
|---|---|
| Design_03 | Lead candidate, interaction PAE 6.32, passed the interface threshold |
| Design_04 | Runner-up, interaction PAE 8.51, also passed |
| Design_07 | Borderline, interaction PAE 9.71 |
| Remaining designs | Failed the interface filter with higher interaction PAE values |
The strongest RFantibody lead was Design_03, with interaction PAE 6.32, global PAE 4.52, and predicted LDDT 0.89.
The RFantibody sequence alignment also showed an important contrast with the BoltzGen output. Across all 10 RFantibody designs, the conserved cysteines were preserved on both chains, including the VL Cys23 and Cys88 pair.
In this run, RFantibody preserved the disulfide anchors that BoltzGen lost.
What This Workflow Demonstrates
This workflow demonstrates three important lessons for antibody design triage.
| Lesson | What It Means |
|---|---|
| The platform rank is not always the binder rank | Researchers should inspect the underlying interface metrics rather than trusting a single composite ordering |
| Fold confidence is not the same as interface confidence | A design can fold well but still fail as a predicted binder |
| Sequence alignment can reveal hidden liabilities | Framework-level issues may not appear in confidence scores but can matter for developability |
One example from the RFantibody run makes this especially clear. Design_01 had the highest fold confidence in the set, but its interaction PAE suggested that it was unlikely to engage the antigen well. If judged by fold confidence alone, it might look attractive. When judged by interface confidence, it was not a strong binder candidate.
This is why the workflow matters. The goal is not only to generate candidates. The goal is to understand which candidates deserve attention and which ones only look promising on the surface.
Reading the Two Pipelines Side by Side
This workflow should not be interpreted as a controlled contest between BoltzGen and RFantibody.
The two pipelines were run in different configurations. BoltzGen designed CDRs onto a fixed scaffold, while RFantibody generated more diverse backbone solutions. Because of that, this run should not be used to claim that one model is categorically better than the other.
What can be said from this specific workflow is narrower and more useful:
| Observation from This Run | Interpretation |
|---|---|
| RFantibody produced more inter-design diversity | This likely reflects the way the RFantibody job was configured |
| RFantibody Design_03 and Design_04 cleared the interface threshold | These were the most defensible candidates to advance from this run |
| BoltzGen design_spec_22 had strong interface metrics | It remained structurally interesting but required repair before meaningful triage |
| BoltzGen outputs lost the VL disulfide in all 10 designs | This represented a serious structural liability |
| Composite ranking did not always match binder-quality ranking | Underlying metrics and alignment review were essential |
In short, this workflow does not say “one pipeline wins”. It shows why researchers should run multiple methods, compare them with the same criteria, and inspect the biological and structural details that scores may not capture.
Why Vecura Helps
For antibody design workflows, the challenge is not simply running one model. It is connecting model execution with downstream review.
Vecura helps reduce this friction by supporting a workflow where users can run multiple design methods, evaluate outputs, and inspect results within a more unified environment.
| Traditional Workflow Challenge | How Vecura Helps |
|---|---|
| Comparing multiple design pipelines can be fragmented | Allows different model outputs to be reviewed within one workflow |
| Model rankings may hide important details | Encourages inspection of interface-level metrics rather than one composite score |
| Sequence liabilities may be missed | Supports downstream alignment and framework-level review |
| Researchers may advance candidates too early | Helps triage predictions before wet-lab handoff |
| Different methods may produce different types of outputs | Makes side-by-side interpretation easier |
The key contribution of Vecura in this workflow was not only generating designs. It was enabling a shared evaluation lens across two design methods.
That lens helped surface a structural liability before wet-lab triage.
A Note on Scientific Interpretation
This workflow was fully in silico. All metrics discussed here are predicted confidence metrics, not measured binding affinities.
None of the candidates described in this workflow should be interpreted as a confirmed binder, therapeutic candidate, or experimentally validated result. The outputs are best understood as computational predictions for triage.
The comparison also describes this specific run and these specific settings. It should not be generalized as a definitive benchmark of BoltzGen versus RFantibody.
The value of the workflow lies in the process: running multiple design methods, ranking them by relevant interface metrics, aligning them against the parent, and identifying liabilities before experimental work begins.
Where the Workflow Goes Next
The next steps would be practical and validation-oriented.
For the RFantibody lead candidates, the workflow suggests confirming the epitope interaction through 3D interaction fingerprinting and running humanness and liability review on the top CDR sequences.
For the BoltzGen lead, the deleted light-chain cysteine positions would need to be restored or the light-chain design mask would need to be corrected and re-run before re-evaluation.
Eventually, any shortlisted candidates would need experimental expression and binding measurement. Only bench validation can turn a predicted candidate into a measured result.
Try Antibody Design Workflows on Vecura
Tony’s workflow highlights a practical principle for AI-assisted antibody design:
Do not stop at generation.
Do not trust a single score.
Compare multiple design methods.
Read the interface metrics.
Align against the parent.
Find liabilities before the wet lab does.
Bring your antigen to Vecura and explore antibody design workflows across multiple models in one platform.
Run antibody design workflows on Vecura
Try Vecura now.
Bring your own inputs and start exploring what Vecura can do.